Showing posts with label develop. Show all posts

Monday, March 2, 2015

Continuing The Tradition...

Today was a little different for me.  I was on my way home and I drove passed a local camera and film supply chain, known as Henrys.  (www.henrys.com).
I'm always a weakling when it comes to film and camera stores.  Well I decided to pop in and see what they had, and sure enough there was some Ilford MGIV 16x20 paper.  I thought I grabbed the Fibre based, but instead I grabbed RC.  Ah well, that's okay, I'll be able to work with it that way no problem, especially since I have a couple of photos I am dying to turn into 16x20 prints!
Now to find some 16x20 trays... Yes I bought paper I cannot develop yet, shaddup!  It's a smart idea, because now I have no excuse but to find some!

maybe I'll pop into a hardware store and improvise somehow...
ABS tubing perhaps??

Anyway, onto the main part of this post.  Although I am not shooting quite as much film this year as others, I am making up for it by getting caught up on printing.  I do not believe for a moment that a photo should live as a negative or a scan, or even on a computer, but should be finalized as a print.  If you want to feel something for that photo you love, make a print...

Well, my eldest (almost 7) he saw the big pack of paper and thought it was neat... Since he's learning to read and wanted to know what it was I had him sound it all out.

"ILFORD PHOTOGRAPHIC PAPER"...

Took about 5 minutes of work and sounding it out syllable by syllable, but he felt very very proud of himself to be able to do it.

Sure enough they wanted to know what I do with this paper, so I told them.  BUT that wasn't enough.. Looking at the time I realized, yeah I have enough time before dinner... So I said, "alright, come with me, but it'll be really dark down there!"
Didn't phase them at all, especially the youngest who has no problem with the dark.  Eldest, well, he's a little scared of the dark.

Well they came down with their little flashlights to light the way, and waltzed over to my darkroom.  Sitting down on the milk-crates I gave them a dry walkthrough of how it works.
I showed them picking the negative and loading it into the holder, to how it looks projected down onto the paper.
They even looked through my grain focuser to see the image and how it is focused.

After a dry run with the lights off, they asked if they could see me make a print.
I took my youngest's flashlight (he doesn't quite understand) and let him pull the chain to turn off the light.
Flipping the switch on my Besseler 45MXT to turn on the safelight so they could see (and myself included) I filled the trays with the Developer (which is close to a year old, has been mixed with some Ilfosol-3 and D76, don't ask, and looks like really bad Guiness), Stop and Fix (fix at least is very fresh as I just mixed it less than 24 hours previous).
After that was done I told them to both stand up and see the image as I "stop down" the lens.  They thought that was neat, but thought it was even cooler to see the iris of the lens I was holding up (Schneider-Componen 80mm ƒ/5.6 for 645 and 6x6 negatives) to show them why the light was dimming as the iris closed.

After that was set (ƒ/8 on the lens) I set the timer on the enlarger (using my Bogens 69 Special for 35mm) to 30s.  I rarely do test strips, as I seem to be able to just look at the light and know the time required to make the print.. Don't ask, but so far I've never been wrong with RC paper (track record isn't quite as good with Fibre).
Under the safelight I showed them the 8x10 paper I was going to use (Ilford MGIV Satin RC) and how it has two sides.  The matte rough side, which is the back, and the smooth shiny side that is for printing.  They got to feel it and thought it was really cool!
Loading it into my Easel I turned off the safelight and said, okay now we do the print!

I flipped the switch on the timer and told my littlest to stand beside his big brother (who was still sitting) so he could see what was happening.
As the timer silently clicked down to 0 I told them that the next part will be like magic.
The room went black again....  I flipped on the safelight and pulled the paper out of the easel and told them to stand up and stand over beside the developing tray.

Here comes the magic....

I put the paper into the developer and started rocking the tray gently... back.... and forth..
10 seconds... back and forth...
20 seconds... back and forth...

Then the magic happened.... The image started to come to light and the kids expression... "wow!  I see it, daddy... I see it!"
30 seconds...

And for almost 2 minutes in the developer the image was finally done...

Into the stop for 10 seconds and finally the fix for 5 minutes...

The lights came on and the kids were amazed at the magic of the print..  After explaining to them how it all works and explaining to my eldest how two negatives create the positive image and why you get a negative when you shoot film (not that I really expect him to remember it) I dumped the chemicals back into their respective bottles and up to the bathroom to wash the print...

So I showed my kids the process that is more than a century and a half old, and still holds the magic for me today as it did the first time I ever saw a print appear in the developing tray....
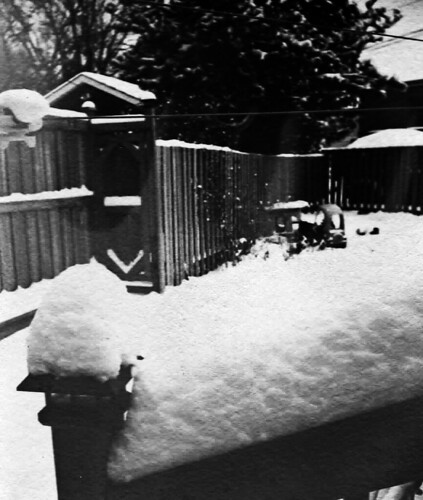
Frozen WalkThis print will be a little special for me, as it is the first print I made with my two boys...

Made on Ilford MGIV RC Satin from a negative originally taken on Svema Blue Sensitive film shot on a Canon T90 with a Osawa 24mm ƒ/2.8 lens.  Film developed in Ilfosol-3 1+14 for 6 minutes...

Until next time, keep those shutters firing!

Thursday, June 19, 2014

B&W Slides - The Easier Method

Recently I've tried making B&W slides using the traditional method of, Develop in a selected developer, such as HC-110, Rodinal, TMAX developer, or whatever other type of developer you want, then bleach in a Potassium Permaganate/Sulfuric Acid mix, fog under light for 60 seconds (or longer) and redevelop using a strong developer like DekTOL stock solution to develop the remaining silver.

The slides were usually okay, but because of the age of the product (probably mostly the clearing agent) the slides weren't the best.  And they are also very very delicate after the bleaching process because of the acid softening the emulsion.

Well, I put a challenge out to +Kelly-Shane Fuller, who I truly hope doesn't mind me stealing his image from Flickr for my own nefarious purposes, to use his HC-110/C41 developing method to create a B&W slide from Ilford's XP2.

His method is as follows;

HC-110 Dil. B @ 30°C for 12:00
Dump and Stop (water stop/acid stop)
Pull out and expose to light.  (Time is not really important, but you want to make sure it's entirely exposed to light).
Redevelop using C-41 Chemicals at prescribed time and temperature for C-41 developing.
Rinse
BLIX (Bleach/Fix)
Stabilize
and finally...
Dry.

This method is tried and true for creating beautiful colour slides using all manner of E6 films, like Velvia, Provia, Astia, Ektachrome, etc.  (No sorry, K-Chromes will NOT work with this method).

Now before you start commenting on colour stability with CD3 instead of CD4 chemicals, or vice versa, I am, as Kelly-Shane is, well aware of that.  It is not something terribly alarming, and this method is probably used for immediate results, but cannot guarantee longevity of the film's colour stability.

For Ilford's XP2 Super film, it is probably more that adequate for this, considering it is a Chromogenic C-41 film, and there is no colour anyway.

So, what image came up? And what image did you steal?

Actually, I only stole the link, and if you click on it, it will link right back to his FLICKR page, and I give him every bit of credit, and support, on his image.

So here it is...

Oh and before I share it, I want to also mention that he accepted the challenge, and blew my mind with the results he got!
So much that I'm going to accept any donated rolls of Ilford XP2 super that you want to get rid of, as I will happily accept them.

That said, however, if you choose to keep your rolls, I will also be purchasing some and giving this a go myself!

So Ilford XP2 Super 400 Speed C-41 Chromogenic B&W film (35mm film) exposed at box speed using a 1958 Yashica 44 (Sprocket Rocket Special)


Puff Ball
"Puff Ball" - By Kelly-Shane Fuller - Yashica 44 - Ilford XP2 Super

So until next time, keep those shutters firing!
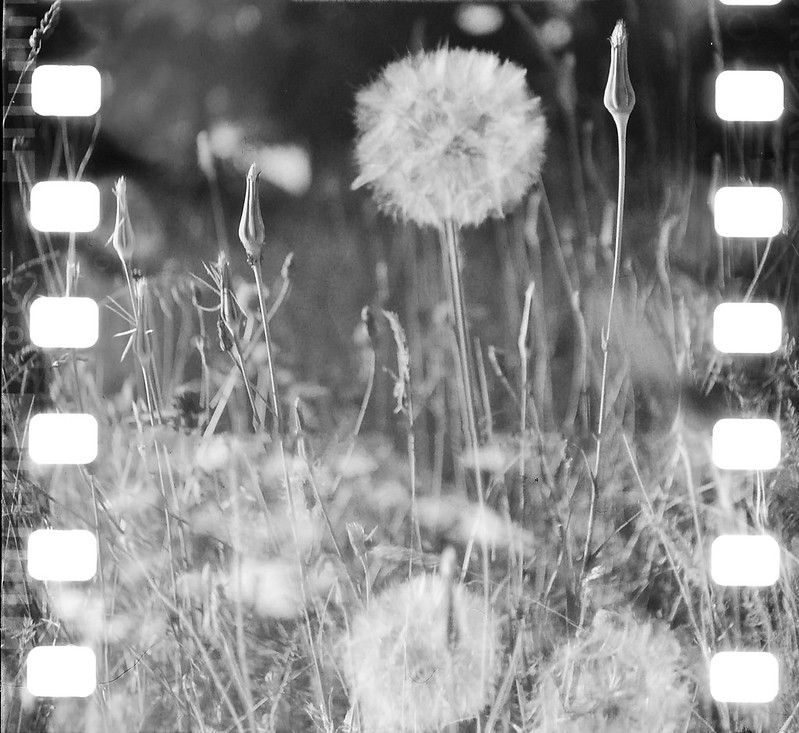
Image is owned by Kelly-Shane Fuller, and used solely as a example of his prowess with developing films through unconventional methods.

Saturday, March 1, 2014

FilmPhotography Project - SVEMA 125 C-41 film

Recently I was sent a batch of new films in the FPP vault.  Some B&W, some colour.
The Colour films included some Hawkeye Traffic Surveillance film, and some fantastic SVEMA 125ASA C-41 film.  This stuff has a really bizarre colour palette, and some lovely grain.  It's a really impressive film, actually..
Well, being the first time I was shooting it, I decided to load it into my T90 and set the camera to use ASA64.  1 stop over, why not!  It's how I roll..!So I went about my business shooting the roll with abandon.  Travelling with a group of film shooting nuts, like +Alex Luyckx and Ori Carmona, including one Sara Mir, who out of nowhere produced a Yashica-A TLR!  It was like magic!  I turned around, and there is was in her hand.  So I quickly focused in my Canon T90 (with a Vivitar 28mm ƒ/2.5 mounted) and snapped off this photo.  I angled the lens just enough so that I saw the light flaring across the lens, and just had that feeling.. "BANG" I nailed the shot that'll really capture the moment.

Sometimes the light is just perfect the moment you focus in the image, and using the T90's legendary SPOT metering system, and setting a relatively wide aperture, it was just perfect!

I almost always use the camera in Manual or Aperture priority mode, and this time the Aperture Priority mode really nailed what I was after.
Perfect light, perfect shadow..
And a flare that will set this photo apart from the rest

Sure I got some images of others that day, like Alex, who is always sporting his killer WWII style trench coat. He was also sporting a fancy looking Contax G2 camera.

Naturally when we left, another photographer sporting a Leica M5 just so happened to notice his G2 and quickly stated, "I love that camera!"
So, yeah, I can't deny, it really is a sweet looking picture taker!

Well, we were hiking through the wonderful place known as "HIGH PARK" and discussing all sorts of things during the walk, from Digital Negatives, alternative processes, and Alex's new found love of Pyrocat PMK!

Seeing his TXP320 work for his 52-sheet project, I can't deny his love of that developer!

WOW!...  It really is a lovely mix.  Then again, TXP320 in 4x5 is an awesome film.  Beautiful grain, and a tonal range that makes your heart beat just a little bit faster.  Yup, it's a gorgeous film, we can all agree on that!

This film, however, the Svema 125, is about as good as the FN64 was in B&W.  I haven't posted my blog on the FN64 yet, but lets put it this way.  It's absolutely incredible!  I have some lovely images using that film, and it's just... wow!  I have been looking for it in 120 as well.  It's just too good NOT to use in 120!  35mm is fantastic, so 120 will be... out of this world?

So that said, the colour film is just as good!
Sure it's grainier than you'd expect from a medium speed 125ASA film, but honestly, it's a nice grain! Smooth, and easily enjoyed, especially with a splash of yum for the colour tones.  What a colour palette on this film.  It reminds me of a mix between Kodak Gold, and Fuji Superia, with a slice down the middle.  Has great warmth, like GOLD does, but yet a funny cast to it.  Almost like its Magenta layer is in bed with the Green Layer, letting the Cyan layer run free.
It has a green cast to it, and at the same time, really doesn't have a "ORANGE" backing like most of the other C-41 films.
After processing, it almost had a "Cross Processed" hue to it.
Perhaps this film can be XPRO'd in E6 chemicals for a very interesting slide?
I'll have to try it using the +Kelly-Shane Fuller method of E6 processing, where you use B&W chems, then fog and C-41 the rest..
Never know, it might very well be some weird palette E6 film as well!

 Here's the thing, though.  Through some colour balancing, you can get a pretty accurate rendering of the colours from the day, or a true-to-life feel to the images.  The tones are wonderful, and the contrast on this film is fairly soft, which is nice.
Scanning is really simple, but honestly, scanning is only half-the fun of the film.  What it really boils down to is the print.  This film would probably be great for making some RA4 prints, but I just don't think I'll ever get into that style of printing.
But B&W Silver gelatin printing, oh yes.  It's great!
In fact, this film, with a #4 contrast gel, prints up beautifully!  I know, because I did it..  The image of Sara with her Yashica-A I printed for Ori (seen in the above image).  What he does with the photo, well, completely up to him.
There is something about this film, though.  It has a look that puts it on a different playing field than Gold or Superia.  Sure, Superia is nice, but Fuji and I have had a falling out.  Gold, lovely lovely film, great warmth to it, but... again, something about this Svema film.  Maybe it's my love for funny Russian films, considering Polypan is possibly a film that was make at the old Shoska plant, which was bought out by Svema.  Who knows!

But it can really be as warm as you want it.  I love warm toned film, and this is definitely right up there.  The thing is, when the light changes, and you are suddenly faced with a much cooler temperature of light, say more cloud cover and less warm sunlight, you might get a funny tone in your film using Gold.


This film, nope!  I get cool blue shadows.  What I saw is what is there.  It's like the film knows exactly what I want it to see, and it sees it with me.
Perhaps it is the camera and myself becoming Zen.  Who knows, but there is really something to it.

I guess as long as it remains available I'll be trying to get my hands on it.

The greatest part of this film was after the processing.  No, it doesn't need some fancy developer, as it is a typical C-41 film, not like there's any special developer for C-41, as C-41 is C-41.  CN-16 is CN-16 (which is Fuji's C-41 developing name).

It actually dries flat.  There was literally no curl, no cupping, no weird I'm going to strike you in the eyes type of look to it. Just beautifully flat film!  The kind you want to smile and hold and hug because it is going to make your life of scanning easy!
Heck, even a film that curls is a pain to print under an enlarger.  Getting it line up and set in the holder under the light for printing with a curled or cupped film sucks.  If it's badly curled, it's hard to load.  If it is badly cupped, it might sit funny in the carrier, and get possible scratched when it gets compressed under the head.
This film, however, like the FN64, sits wonderfully flat!
Very impressed with it...

Anyway fellow bloggers, should you want to try your hands at shooting this film, check it out at the Film Photography Project's store.  SVEMA 125 Colour film can be had for just $16.99USD for 3 rolls! (Price as of March 01 - 2014).

What a wonderful gift to that photographer in your life this would be.  Or maybe it'll be the perfect gift for yourself to shoot.

Well, go for it!  You won't be sorry.

Until next time, keep those shutters firing!

All images taken on Canon T90 35mm SLR using a Vivitar 28mm ƒ/2.5 lens on Svema 125 C-41 film, and processed by David Nardi of E6IT.ca and scanned on a Epson Perfection 4990

Wednesday, January 15, 2014

Life to Old Lenses

So some may call me evil, and some may even call me nuts..
While others will think it is terrible that I have ripped apart old folders for their lenses, but here's the thing. The cameras are basically just decoration, and for me, that's not much of an option.  I am also considering selling a few of my cameras.  Mainly the ones I do not use, but that's a hurdle I'll climb when I come to it.

Anyway, one of the cameras was a Kodak Autographic Folding Brownie No. 2a, which has a Baush And Lomb Rapid Rectilinear lens.  The stops listed on the lens if 8 16 32 64.  The thing is that is the old style Universal Stop.  ƒ/16 is US 16, so US 8 will be ƒ/11.

So it's a very easy conversion to understand.

I have tested these lenses out prior to actually committing them to film.

A Lot Of Snow
"Snowy Post" - Kodak Rapid Rectilinear Lens
Ilford MGIV Fibre based paper - Dektol 1+3
Paper Test

Getting the Monorail to the site to setup the shot was fairly easy.  Slippery somewhat, but not too bad.
I had a yellow filter and a polarizer on the camera, oh and a fashioned lens hood out of a black plastic thingy.

"Flow" - Kodak Rapid Rectilinear 114mm ƒ/11 @ƒ/16
1/15s Exposure - Ilford FP4+ 125ASA

I really think that this lens is far sharper than I originally though it would be.  I was actually hoping for some anomalies that never manifested themselves, which is actually rather unfortunate.

But perhaps that'll change when I give the Achromatic lens a go!  It's different than a Rapid Rectilinear.  The Achromatic lens is basically a cemented Doublet lens, but instead of the lenses being separated (front and rear elements) by a pocket of air, they are actually cemented together.

Should make things interesting!

Until next time.  Keep those shutters firing!

Saturday, January 4, 2014

Pushing or Pulling - Welcome to Film

So I have noticed a common question, and that is.  Push or Pull.

What is Pushing and pulling?  Can it be done with Digital, or is it a strictly film practice?

Well, the answer to that question is... well, yes and no.  Can you push a digital image, you can.  But that is all done in post processing, and requires a lot of patience.  And, like film, will work a similar way, but instead of accented grain, you get accented noise.  More often than not, it doesn't look very appealing on digital, where as on film it can look pretty good!
With a lot of patience and care you can do it with a digital image.
Lets take this image, for instance..
Under exposed, but not too badly.  Say 2 stops under, which is easily worked with.  So after a bit of level tweaking in Photoshop, and having to up the contrast a bit to keep it from looking washed out, here's the image..


So now you can see more detail inside the bus, and even behind and around it.
This is essentially similar to PUSHING film.  You can see the highlights have also started to get a fair bit stronger and it is a higher contrast.
But, in areas that had no exposure, such as under the bus, behind the driver, and around the houses in the b/g, they are still in shadow. Since there is no exposure, there is no information to bring out.
Now how does this relate to pushing a film?  Well, lets take that the image was about 2 stops under exposed.  That's because I set the cameras ISO setting to 200 so that I would get a smooth motion on the vid screen of my phone to compose it.  I chose a phone image over a dSLR as, for one I had no under exposed image for my dSLR, and 2, this image is probably one of the better images to use for explaining a push.

So what did I do to "push" this image?
well, first off I changed the curve to bring out more of the midtones and started to try to draw out the shadows.  In doing so I caused the image to feel... well washed out and unbalanced.  So I had to increase the highlights, and when I did that the image looked better but it just didn't have the right balance, as it was definitely washed out with light shadows, smooth midtones, and highlights that were strong, but seemed to blend too much with the mid-tones..
SO I had to increase the contrast.  This is where it starts to resemble a pushed film.  The shadows stay dark, as they are supposed to, instead of a 18% gray, or a darker gray shade, and the highlights start to feel a little over powering.  The problem is, if you scale back the highlights, they actually become dull, and blend with the mid-tones, and the image feels flat.

So in theory, yes, you can push a digital image,.
So what about pulling a digital image?

This is where film and digital actually start to slip apart.  Pulling a digital image is far more difficult, as the highlights are going to lose detail far faster than the shadows will.
This is where Latitude starts to come into play, and where film starts to win the fight.  At least, Negative film. Not a FILM vs Digital post, I'm explaining Pulling and Pushing.   I have explained PUSHING with a positive image in a digital sense, and now pulling.
See, when you pull an image, you are actually halting the development of the highlights after over exposing the image.  This is the tricky part with digital.  It is also tricky with E6 films, which are a positive image similar to Digital.  The only thing is, with an E6 film, prior to developing the film, you can decide on how to develop it.
Wth positive film that is over exposed a stop or 2, and you pull it, you keep the highlights from developing to the point of clipping, and create a smoother contrast over the image.
This is the point where digital cannot compare...  to work around this, photographers develop an HDR image, which stands for "HIGH DYNAMIC RANGE".
The problem is when you see most HDR images, it has the Saturation pumped way up, and it looks like a false image.  See the human eye actually lies to you and what you see.  The brain is so powerful that it will actually adjust the image your eye is seeing and keep the highlights that you see from being just that.  In fact, if you look at a darkened place while in a bright area, no with the sun in your eyes, you can see into that darkened place, so long as you don't have any strong reflective surfaced rebounding harsh lighting into it.
And if you are in a dark area and look outside, good chance that you will be able to see some of the colours of the sky
Your iris will adjust itself against the light.  Narrower for bright, and wider for darkened areas, similar to how the camera works.  But unlike the camera your brain has exceptional corrective abilities that film or digital does not.
So the image you see in an HDR image feels, well, like it is wrong, and that it just isn't how it should be.
But the concept is usually there. The sky is a smooth shade of blue, tapering off toward the grown as a lighter cyan until it makes contact with the Earth.  At that point the shadows are now defined, and you get a good fair amount of detail in the darker areas of the image, without it being washed out or clipped.  Underexposed shadows, or over-exposed highlights just don't exist!
This is how digital has begun the process of how to "PULL" an image, and in doing this, the photographer takes a series of bracketed images.  Say a series of 7 shots.  One being the control, or EI0, 3 at +1 +2 and +3, with the other three at -1 -2 -3..
Using a program light Aperture, lightroom, or Adobe Photoshop they combine these shots and create a layered image.  The photographer then can pick and choose how each layer intertwines and defines each zone.
They can bring Shadows up to Zone IV, while pulling the highlights back to zone VII keeping everything within equal viewing range, and having a smooth contrast image that is not over powering, or under whelming.
That is a whole bunch of added steps to pull a digital image and keep it from being over-exposed, or under exposed.
Take that same roll of E6 positive transparency film that you over exposed 2 stops.  Well, when you pull it in processing, you are halting the development of the
This causes the image to lose contrast, but gain shadow detail and retain the critical highlight detail.  This is very useful when shooting without gradual N/D (Neutral Density) filters, which help against over exposed highlights and keeping the ground and shadows in a more visible range, instead of dark and underwhelming.
highlights, and allowing the shadows to actually catch up!
So that's the idea behind pulling a film.

But all that did was cover Positive film, and not negative film.

Yes, but the theory is the same.  Negative film has a higher (much higher) latitude than Positive films, like E6 and Digital, which sometimes you do not actually have to waste your time with a Push Pull method.
Many modern emulsions have enough latitude to capture a under exposed image, sometimes even up to 3 stops under, or an image up to 3 or even 4 stops over exposed!  And to do all that without a single change in how your developed the film.  It handled it through the latitude of the film itself.
So in a basic nutshell, lets look back at this.  What is Pushing and what is Pulling.
Pushing is the method of under exposing an Image and taking more time to develop it.  With digital, it means fine tuning the curves to try to keep it from being overly noisy, yet still well defined.  Trying to control the contrast, highlights, and not letting the shadows become a gray tone and noisy.
With film it means that you spend more time developing the film.  As pointed out with a digital image, you will not gain shadow detail at all.  You increase the contrast, and brighten the mid-tones and increase the density  of the highlights.  Stronger, brighter, and more dense highlights, while keeping deep and solid shadows.  Where there is no exposure, there can never be exposure, so you can push until the film just stops reacting to the developer, and you will never gain any exposure in the shadows.  Where there is no information, you cannot draw out information.

So lets take a film out there like Polypan F.  This is a 50ASA rated film, so we'll take a look at an image I took at 50ASA, developed normally.  The film is smooth, with even and lovely contrast, and some lovely gray tones that make this film super famous, especially after the promotion and work that myself, and fellow Polypan Shooter and abuser Larry Dressler has done.  The thin base, lack of anti-halation, and polyester backing make this film prone to blooming, which is the spreading of the highlights.
Just look at the head on this pint of beer.
So this is quite a basic image, nothing special.  How does it relate to pushing or pulling?
Actually, quite a lot!  This is showing the film as it is supposed to be. Exposed and developed at box speed, without any extra steps.
So lets say I have only that same 50ASA film and I just went from the bright outdoors to a subdued lighting indoors.
I could;
A) Use a tripod
B) Use a flash
C) Push the film

So I don't have or cannot use a flash.  A Tripod is not an option. and will be rather difficult to use, so I will choose option C.  I will push the film.
How much, is the question.  Lets go with 2 stops so ASA200.
So here is an image I exposed at 200ASA with Polypan F.  Shot indoors, slightly different lighting, and a completely different time of year, but the principle is the same.
Longer time in the tank to develop the mid-tones and highlights.  So the highlights start to get stronger (look at the cup behind the hat, shadows are deeper and the image becomes higher contrast.  Under the hat is black, while the hat itself remains quick evenly toned.  Contrast is also significantly stronger.
This is pushed film.

So lets now recap this entire post on Pushing and Pulling.

Pushing and Pulling is a method that is done at the development stage of processing your film.  It cannot be done before or after the film is processed.

It is through over exposing and under developing, known as pulling, or under exposing, and over developing, which is known as pushing.

So how can you call what I did to the digital image Pushing?  Because it is during the Processing stage of the image, before the final image.  That said, the negative is not the final image, but the Print is.
Working with an under exposed and normally developed negative is very difficult.

When do you use PULLING as a technique?

Well, lets say you load some 400ASA film, but either forget to set the ASA dial, or in the case of AUTO-DX coded cameras, maybe the canister isn't DX coded, or it is a bulk loaded can.  The ASA setting on the camera is slower than the loaded film, and when the images are all shot on the roll, they are over exposed.
Then you'd consider pulling.  Some films that is unnecessary for 1 or 2 stops, while others it is very necessary to prevent over exposed and overly dense negatives.

The other reason is to control contrast in high contrast scenes, like say a beach or a snowy landscape.  Or perhaps to reduce the contrast of a high contrast film, like Microfilms.

There are many reasons to pull a film, and some are employed by large format photographers who use the "ZONE" system.

What about pushing a film?

Pushing a film, well, similar idea.  You load a slower film and require a faster one, or forget to reset the speed dial and leave it faster than the film loaded, or the DX coding isn't set.  This is when you'd consider pushing a film, or to gain contrast in lower contrast films.
Even photographers who use the Zone system will also push a film

So in a basic nutshell, that is pushing, and pulling, film.
It is not quite as complicated as all the above, but it sometimes requires more explanation than just;

PUSH = UNDER EXPOSE OVER DEVELOP
PULL = OVER EXPOSE UNDER DEVELOP

Sometimes you'd like to know when to apply such techniques, or why people employ such techniques.

Until next time, Keep those shutters firing!